How to handle dynamic boundaries in LoadRunner using Text Flags


To do correlation in LoadRunner we need both Left Boundary and Right Boundary of the dynamic value which we are planning to capture, but if there is a situation where boundaries are also dynamic..?

Technique to do correlation when boundaries are dynamic

For complex changes, we first capture a subset of the server response, based on some unique boundaries identified, and then with the aid of custom built-in Text Flags in the correlation functions, we get the desired substring out of the captured string.
Simple solution for this is to use “Text Flags”, where I provide you with few different scenarios with solutions

Type 1:
Consider that you have a situation where you need to capture text/string DynamicValue, but the problem here is left boundary of the string changing every time you replay. For e.g. you get the left boundary as abcXdef, where X ranges between 0 and 9 as

abc0def=DynamicValueRight Boundary
abc1def=DynamicValueRight Boundary
abc2def=DynamicValueRight Boundary
-
-
-
-
abc9def=DynamicValueRight Boundary

Solution:
To capture the desired text/string, we can put the following by modifying the correlation function argument with the text flag as **/DIG, where for the above scenario we need to place LB/DIG argument as shown below

web_reg_save_param(“Param_Name”,”LB/DIG= abc#def\=”,”RB=Right Boundary”,LAST);

Note: The dynamic values in boundaries are replaced with # symbol.

Type 2:
If the dynamic values are of below scenario

abc013def=DynamicValueRight Boundary
abc122def=DynamicValueRight Boundary
abc232def=DynamicValueRight Boundary
-
-
-
-
abc906def=DynamicValueRight Boundary

Solution:
In the given scenario there are multiple digits which are randomly changing, so we have to place the # sign for each random digit.

web_reg_save_param(“Param_Name”,”LB/DIG= abc###def\=”,”RB=Right Boundary”,LAST);

Type 3:
If the dynamic boundaries are of below type (Alpha numeric)

abc0c3def=DynamicValueRight Boundary
abc1h2def=DynamicValueRight Boundary
abcn3edef=DynamicValueRight Boundary
-
-
-
-
Abcz46def=DynamicValueRight Boundary

Solution:
In the given scenario the left boundary values are dynamic with different alpha numeric values, so we need to place the sign ^ instead of #, by modifying the correlation function argument as **/ALNUM instead of **/DIG text flag with the desired boundary argument.
web_reg_save_param(“Param_Name”,”LB/DIG= abc^^^def\=”,”RB=Right Boundary”,LAST);

Type 4:
If the boundaries are containing case sensitive nature

Solution:

Whenever there is a nature of case sensitive, we  need to modify the correlation function argument as **/IC/DIG text flag with the desired boundary arguments as below

web_reg_save_param(“Param_Name”,”LB/IC/DIG= abc#def\=”,”RB=Right Boundary”,LAST);


Below is the list of text flags that LoadRunner can support


Argument
Description
/IC
To ignore the case type
/BIN
To specify the binary data
/DIG
To interpret the sign # as a wildcard for a single digit
/ALNUM
To interpret the sign ^ as a wildcard for a single alpha numeric type


Handling dynamic values in LoadRunner


As you all know that to make a recorded script work for multiple users, we need to handle few dynamic values, which varies for user to user. These dynamic values in LoadRunner can be handled using a specific function

web_reg_save_param(const char “Param_Name”, <List of Attributes>, LAST);

The list of attributes that are available for web_reg_save_param() are:

Param_Name: Param_Name is a variable which save the dynamic value that is handled by the function and can also be used for further reference.

LB: LB is the attribute that denotes the left boundary of the dynamic value / required parameter, this should not be a NULL and also it is case sensitive.

RB: RB is the attribute that denotes the right boundary of the dynamic value / required parameter, this should not be a NULL and also it is case sensitive.

NotFound: The handling method when a boundary is not found and NULL string is generated. 
If “NOTFOUND=error”, this is the default value which indicates that an error to be raised when boundary is not found.
If “NOTFOUND=EMPTY/WARNING”, this will not issue any error message and executes the script.

NOTE:
When “Continue on Error” is enable in the runtime settings of the script and even “NOTFOUND=error“ will writes an error message in the Extended Log and script execution will continues.

Ignore Redirections: If "Ignore Redirections=Yes" is specified and the server response is redirection information (HTTP status code 300-303, 307), the response is not searched. Instead, after receiving a redirection response, the GET request is sent to the redirected location and the search is performed on the response from that location.


ORD: This is an optional attribute, need to use according to the requirement. When you specify “ORD=n” (where n can be any occurrence) it save the specified occurrence of the parameter and when you specify “ORD=ALL”, it saves all the parameter values which are occurred thee specified LB and RB in an array. The default value of ORD is 1.

SaveOffset: An optional attribute with default value as 0. This saveoffset value is used to save a sub string of the found value into the parameter

Search: This attribute is used to specify the scope of the search where to find the requested delimiter. The default value is Search=ALL where it search in search body, headers and resources and other possible values are

Search=headers where it searches only in headers,
Search=Body where it searches only body but not the headers
Search=Nonresource searches only the HTML body by excluding the headers and resources

SaveLen: The length of a sub-string of the found value, from the specified offset, to save to the parameter. This attribute is optional. The default is -1, indicating to save to the end of the string.


Mechanism to handle correlation (Dynamic Values)

·        Auto correlation:

This is an amazing inbuilt feature of LoadRunner, where the tool itself will identify the dynamic value and applies the correlation function to the same.

Steps to do auto correlation:

Step 1: Record the required critical business transaction using required record time settings
Step 2: Click on Design Studio tab once after opening the script
Step 3: In a new window list of all the dynamic values will be displayed which can be correlated
Step 4: Select the required correlation function which are needed

Manual Correlation:

Step 1: Create the 2 identical scripts and save those 2 scripts in windows temp directory.
Step 2: Open any one of the script from the script go to Tools menu.
Step 3: Select compare script for the comparisons, the difference between the two scripts will display in the Wdiff utility.
Step 4: Identify the dynamic context charge between two scripts identically the Left & Right boundary of the dynamic values.
Step 5: Write the correlation function with LB, RB and also with the required attributes.
Step 6: Copy the LB of the dynamic value and search in Code Generation log, once after finding the value in the log. Double tap the value and it will prompt the location where the correlation function need to be placed
Step 7: Search for the First occurrence of the dynamic values to replace by a given parameter name.
Step 8: Select the position to insert the correlated function with all the parameters

Performance testing tool comparison

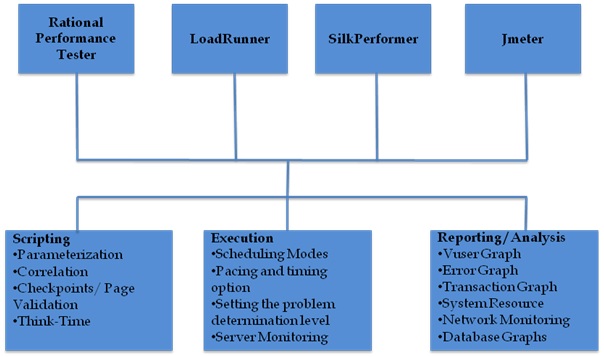
Here I come up with comprehensive solution to provide greater insight into application performance and its overall architecture. By viewing application from multiple perspectives, Total Performance Management helps in collecting all the data to improve the performance of applications and take action to prevent future problems.

Common Tool specific features


Comparison of Performance testing tool features

The below specified comparison was done based on my experience in respective to the tool, this might be changed for upgraded version of the respective tools


How to View Results in JMeter

Your SEO optimized title

How to View Results


Add View Result Tree in Listener to see results. The results in this can be viewed after replay, In the view results tree we can look into

Sample Results:

Which consist of thread group number, sample/thread start time, load time in ms, latency, size in bytes, headers size in bytes, body size in bytes, sample count, error count, response code, response message with response headers included.

Request:

The request window consist of URL request type and also the URL.

Response data:

The response data window consist of response for the particular request, where we can view in different formats like

  •       Document
  •       HTML
  •       HTML Download resources
  •       JSON
  •       RegExp Tester
  •       Text
  •             XML
  •       XPath Tester 


Thread Groups in JMeter

Thread Group


Thread group element controls the number of threads that will be used to execute in your test. In this you can control the number of threads, the ramp up time, execution time and start and stop time of the test.

Available only after enable of scheduler, used to choose the startup delay

Attribute
Description
Action to be taken after a Sampler error
Continue - ignore the error and continue with the test
Start Next Loop - ignore the error, start next loop and continue with the test
Stop Thread - current thread exits
Stop Test - the entire test is stopped at the end of any current samples.
Stop Test Now - the entire test is stopped abruptly. Any current samplers are interrupted if possible.
Number of Threads
Number of users to simulate
Ramp-up Period
To initialize the users on to server
Loop Count
Denotes the number of times the user to perform a particular test
Delay Thread creation until needed
Waits until the completion of the time mentioned to create threads
Scheduler
To enable or disable the scheduler
Start Time
Available only after enable of scheduler, used to mention at what point of time the execution need to be started
End Time
Available only after enable of scheduler, used to mention at what point of time the execution need to be stopped
Duration
Available only after enable of scheduler, used to mention how long the execution is to be happened.
Note: If duration time is mentioned, then the end time will be ignored
Startup delay
Available only after enable of scheduler, used to choose the startup delay


Fig: Thread Group with Scheduler enabled


Fig: Thread Group with Loop Count


 jp@gc – Stepping Thread Group


This thread group will start [ 100 ] threads (Users) –> Total number of users are 100.

First Wait for [ 0 ] Seconds. –> There will not be any delay to start the thread once you will run Jmeter.

Then start [10] threads every 30 Seconds —> every 30 seconds 10 threads will start till 100 Threads.

Using Ramp up [5] seconds –> each users taking .5 seconds to hit the server.

Then hold load for [60] seconds –> Once all the threads started it will hold the thread running for 60 seconds.

Finally, Stop [5] threads every [1] sec. –> in each second 5 thread will stop.


Fig: Stepping Thread Group

How to Configure Load Generators in JMeter (Master & Slave)

How to configure Load Generators (Slave & Master)


Adding Load Generators in JMeter should follow some basic steps like

Things to do on JMeter – Controller (Master):


Step 1:

Go to bin directory in JMeter and open JMeter.properties file using Notepad

            apache-jmeter-2.11 à bin à jmeter.properties

Step 2:

Add the slave computers IP address in the “remote_hosts=xxx.x.x.x”

Note:
We can add multiple IP’s by separating using the “,” operator


Things to do on Load Generator Machines (Slave):


Invoke the jmeter-server.bat file in the slave machines before connecting to the master machine.

           apache-jmeter-2.11 à bin à jmeter-server.bat

Note: Do refer the following link for detailed information on configuring the load generators


Timer (Think Time and Pacing Time)

Timer (Think Time & Pacing Time)


The user waiting time between user transactions and iterations is called as timer; in general it is measured in milliseconds.

There are different types of timers
  •          Constant Timer
  •          Gaussian Random Timer
  •      Uniform Random Timer

Constant Timer


If you want to have each thread pause for the same amount of time between requests, use this timer.


Gaussian Random Timer


It pause each thread request for a random amount of time, with most of the time intervals occurring near a particular value. The total delay is the sum of the Gaussian distributed value (with mean 0.0 and standard deviation 1.0) times the deviation value you specify, and the offset value.


Uniform Random Timer


It pause each thread request for a random amount of time, with each time interval having the same probability of occurring. The total delay is the sum of the random value and the offset value.